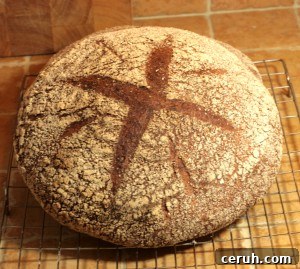
I wanted to write another post about making sourdough bread. Since my first How To Make Sourdough article and the subsequent update, I’ve learned a lot and continue to refine my technique.
I’ve gained experience handling different flours and dough consistencies, and I’ve experimented with varied approaches to developing dough: folding, kneading and no-knead techniques. Over time I’ve settled on a straightforward method that produces a reliable loaf for everyday use. It’s somewhat different from my earlier approach, and many readers have asked for a simple, clear recipe. This post is that method—focused on ingredients and procedure without lengthy background. If you prefer a concise recipe you can print, this should suit you.
If you want to bake along, read on.
How to make sourdough bread recipe
This batch makes two loaves. The hydration is moderate so the dough can be handled without becoming unmanageable. It will feel sticky at first and firm up as the gluten develops. Avoid adding lots of extra flour; work with wet or oiled hands and an oiled work surface if the dough feels too tacky.
Ingredients
200g active starter (100% hydration, equal weights flour and water)
625g warm water
900g strong white flour
100g spelt or strong wholemeal flour (or use 1,000g white if preferred)
20g fine sea salt
Method
Combine the starter and water in a large bowl and stir to disperse. Add the flours and mix until all the dry flour is hydrated and you have a rough, sticky mass. A dough scraper helps, but you can use a large spoon or your hands.
When mixed, the dough will be shaggy and wet. Rest it, covered, for 20–30 minutes to allow the flour to hydrate fully.
After the rest, sprinkle the salt over the dough and mix thoroughly so the salt is evenly distributed. Cover the bowl with lightly oiled plastic and let it sit for one hour.
Perform a series of stretch-and-folds to develop gluten and structure. To stretch-and-fold, reach under one side of the dough, lift it up gently and fold it over the top; rotate the bowl and repeat from each side until you have worked all around the dough. This replaces traditional kneading and builds strength without extensive handling.
Cover the dough and rest for another hour. Repeat the stretch-and-fold two more times at one-hour intervals for a total of three folds. During these stages the dough will change from shaggy to more cohesive, then to a springy, elastic feel. You should start to see bubbles forming as gas is produced. If the dough still feels weak after a fold, add an extra fold session. Eventually the dough will resist folding, which indicates it has developed enough strength.
After the final rest, divide the dough into two portions. Shape each piece roughly into a rectangle, oval or round depending on whether you want a bâtard, a long loaf, or a boule. Let the shaped pieces rest, covered with oiled plastic, for 30 minutes to relax the dough.
Complete the final shaping and place the loaves into bannetons or onto baking parchment. If using bannetons, dust them and the tops of the loaves liberally with rice or rye flour to prevent sticking—ordinary wheat flour can absorb moisture and cause the dough to cling. Cover with oiled plastic and a clean tea towel.
Allow the loaves to prove for 1½ to 4 hours, depending on ambient temperature and the activity of your starter. You are looking for the dough to have some spring—when you press it gently with a finger it should slowly spring back rather than immediately collapse. Unlike commercial yeasted breads, sourdough typically does not double in size; aim for a 25–50% increase in volume as your guide.
About 45–60 minutes before baking, preheat your oven to its highest setting. A very hot oven at the start is important for oven spring. I bake on a granite stone that gives good bottom heat and a crusty base; alternatives include ceramic tiles, a pizza stone or a preheated baking tray.
If you like a steamy environment for a better crust, place a tray on a lower rack and add boiling water to it 10–15 minutes before loading the loaves. Be careful handling boiling water and hot oven trays.
When the loaves are proved, score the tops and transfer them to the preheated stone or tray. Reduce the oven to 230°C and bake for 15 minutes with the steam tray in place. The loaves should rise noticeably during this initial bake.
Remove the water tray, lower the temperature to 200°C and continue baking for another 30–35 minutes, or until the crust has reached your desired color and the loaves sound hollow when tapped. I often bake for 50–55 minutes total to achieve a deep, crackling crust; if you prefer a softer crust, reduce the final baking time.
Cool the loaves on a wire rack. For a crisp crust leave them uncovered until cool; for a softer crust, cover the warm loaves with a clean tea towel while they cool.
And that’s it—simple, reliable sourdough for everyday baking.
Kamut sourdough loaf
As promised in my post about the Kamut loaf, here is the variation I used. The method is the same as above; only the flour proportions and hydration change.
I substituted 200g of kamut flour for part of the white flour, using 800g strong white flour plus 200g kamut. Kamut absorbs more water than white flour, so I increased the water to 640g for this mix. Everything else in the process remained the same. The result is a loaf with a distinctive crust and crumb character.